Posts Tagged ‘art card’

Dream Fairy Art Card

Friday, May 22nd, 2009

Just a quick post to share a sweet little Art Card. It’s a fairy holding out her pretty dress to show it off, she’s got big yellow wings and a bow on her head with a rhinestone. I added a stamped plaque with the word Dream. It’s on green cardstock and paper torn from a vintage French text book.

Photobucket

Challenge Combo

Friday, April 24th, 2009

I’ve been trying to participate lately in more “challenges”, it’s where a website or group picks a theme, idea or product and everyone makes something based around it and then shares their art. It’s so much fun to see all the different ideas others come up with all based around the same theme.

My “Artchix” yahoo group has a current challenge called “Go Fly a Kite” and my Melange team from Etsy has a challenge called “Ticket” and an idea came to me to combine the two and so I made this ATC called “Flight Ticket”.

Photobucket

Please visit the Melange team website and click on the “Mix it up with Melange” post comments section to find links to other participants art work:  http://melangeonetsy.blogspot.com/ each Wednesday a new challenge will be posted.

You might also want to consider joining the Artchix yahoo group:  http://groups.yahoo.com/group/artchixstudio/ 

More Alice Art Cards

Tuesday, April 21st, 2009

I’ve made a few more Alice in Wonderland themed Art Cards (cards measuring 3 1/2″ x 2 1/2″).

This first one is an image of Alice peering over the edge of the mushroom to talk to the Caterpillar while he smokes his hookah. The image is colored with colored pencils and I added “grass” at the base of the mushroom and ran a thin strip of cardstock through my label maker for the words “Who Are You” floating above them.

Photobucket

For this next card I put the image of Alice looking at her reflection in the looking glass directly on a piece of glass and colored on the backside with markers. I also rimmed the edge of the glass with a gold pen.

Photobucket

Fairyland and some info on coloring with chalks

Thursday, April 16th, 2009

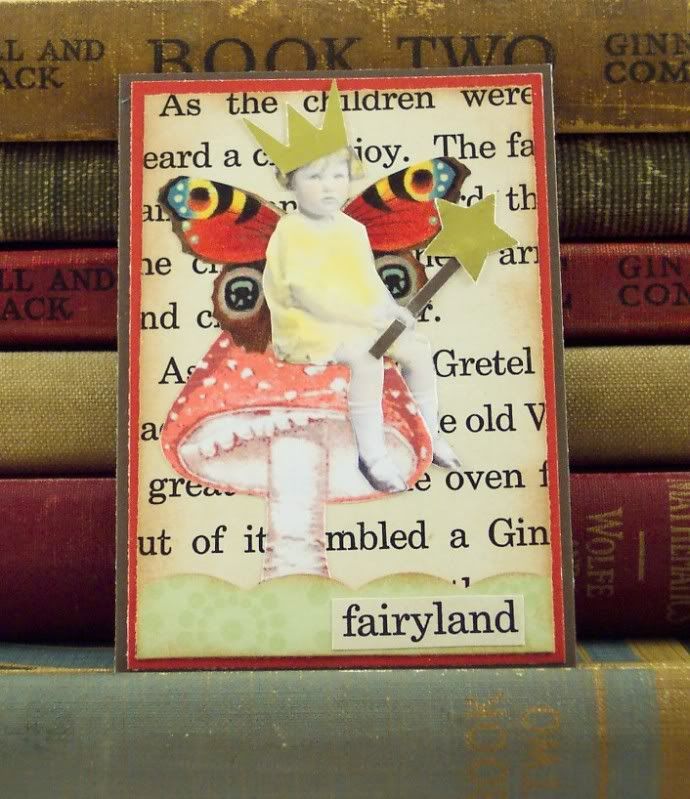
Here’s a cute little art card I made last week. It’s a sweet little fairy sitting on a mushroom wearing a paper crown I cut from gold metallic paper and holding a fairy wand with gold star punched from the same paper. I added a scalloped green paper hill and the words “fairyland” cut from a vintage children’s book. It’s layered on vintage book paper and cardstocks. Since the image of the girl was black and white I added some color to her with chalks.

Here’s some info on chalks. Chalks give you a soft pastel look (they are also called artist pastels) and they work nicely with vintage images, it looks alot like the tinting they did on their photos back then. I use q-tips to apply chalks, it gives you alot of control and it’s easy to color into small areas. Chalks can be blended and colors mixed but it’s usually very subtle. Also with the correct eraser chalks can usually be removed from most surfaces in case of mistakes, so that’s a big plus for them. I like chalks that come in little square “cakes” but “stick” chalks work pretty much the same way. Sometimes you might feel the need to “set” your chalks, a clear spray will work nicely, don’t use a sealant that needs to be brushed on, it will usually smear the chalk. Another fun thing to do with chalks is use a clear blender pen or colorless marker with them, simply rub the tip of the marker over the surface of your chalk and then color with it, it gives a much more vibrant tone to the chalk color and it’s easier to shade. Just rub the tip of the marker on a paper towel until it runs clear to clean it. Test your paper first though as these types of markers can sometimes leave an oily film behind.

Colored pencils can be used to color your vintage images too, they will give you a darker look and more shading but can sometimes look heavy handed on vintage images.

Photobucket

More Paris

Wednesday, April 1st, 2009

I made this ATC for a Travel theme challenge and I guess I still had Paris on my mind:)

The background is cardstock with a scrapbook paper that looks like an old French map. The car is a Tim Holtz stamp, I added an image of a woman driving and then added liquid glass (a clear dimensional adhesive) to all the windows to make them more realistic. I also added a brass charm of the Arch D’ Triumph and the words “Ooh-la-la” embossed in my label maker.

Photobucket