Posts Tagged ‘fairy’
Thursday, June 4th, 2009
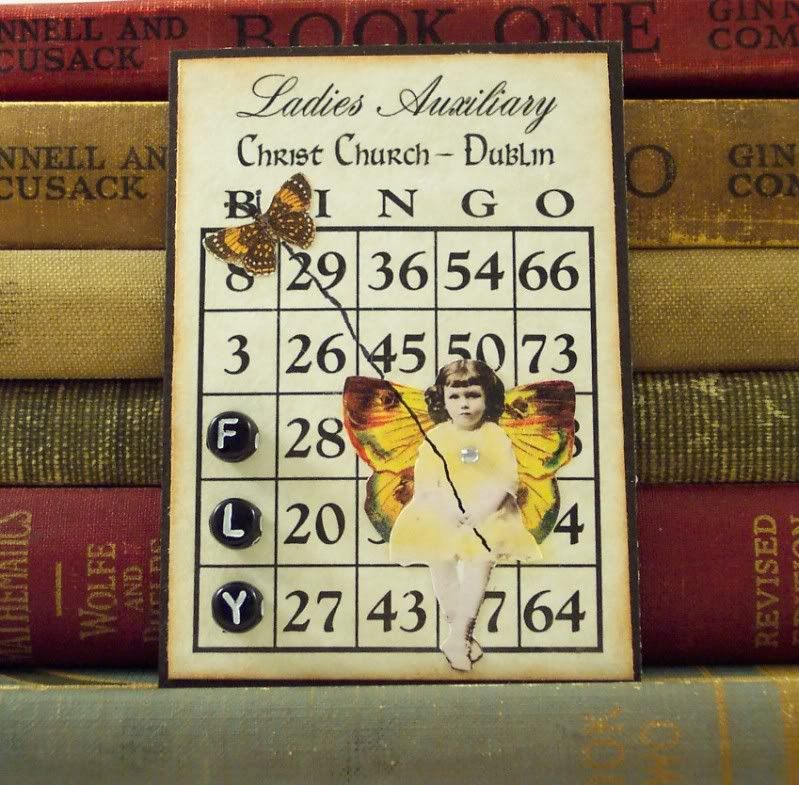
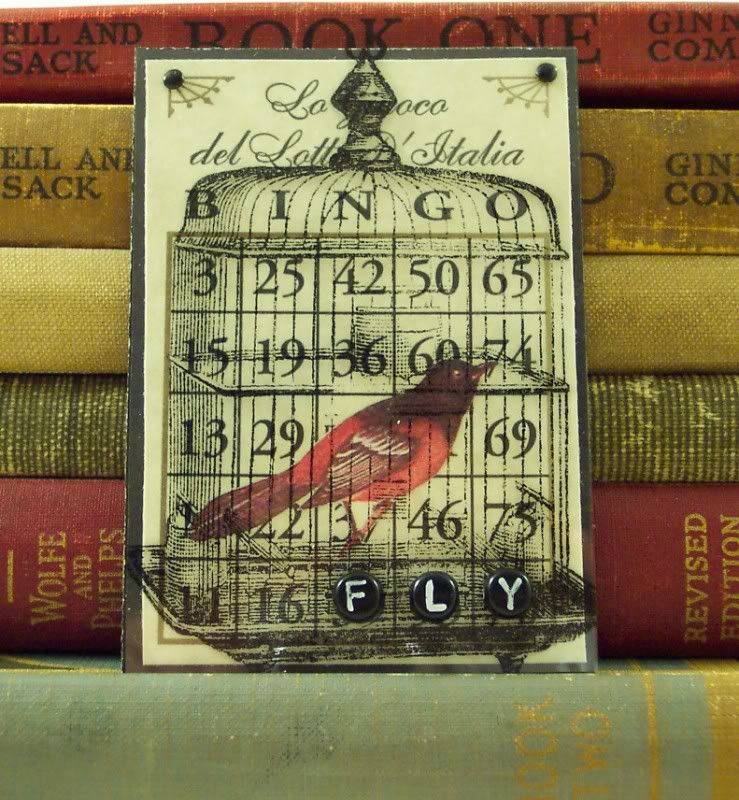
I belong to a mixed media artist group on Etsy called Melange and each Wednesday we have a challenge word and everyone makes an art piece based on that word. This weeks word is “Fly”, which happens to be a favorite word of mine, I use it often in my work. I made two pieces for the challenge, both Art Cards, using some really fun small bingo cards I bought at a convention a few years ago and some cool black and white alphabet beads. Be sure to visit the Melange Team blog : http://melangeonetsy.blogspot.com/ and click on the comments to visit my fellow artists blogs and see what they made for the challenge. Also please feel free to participate in the challenge yourself, you do not need to be a member, just link to your artwork in the comments section too.
my first card is a cute fairy flying a butterfly:
my other card is a bird inside a cage:
Tags:ACEO, art card, ATC, bird, challenge, fairy, fly, melange
Posted in ATC | 8 Comments »
Sunday, May 31st, 2009
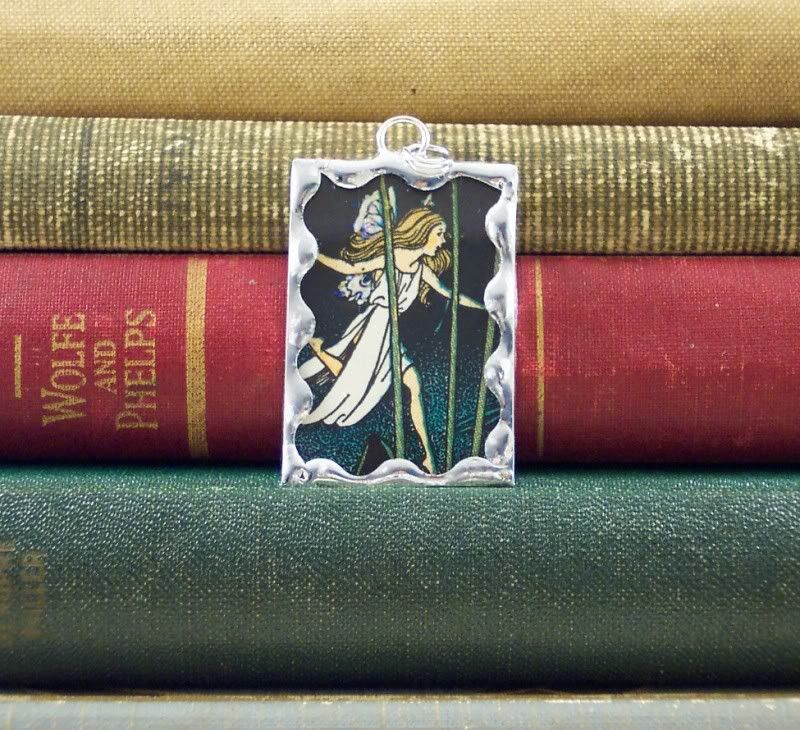
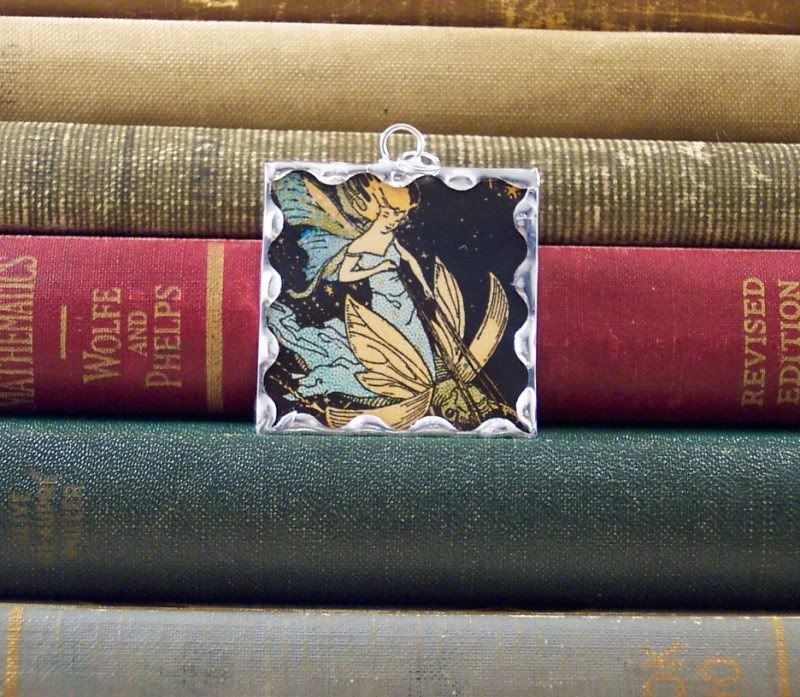
Here’s some more soldered pendants using the latest vintage children’s book I found, these are more “fantasy”.
Fairy runny though flower stalks:
Mermaid swimming under water, I added a sweet turtle charm to the bottom:

Fairy riding on a beetle (very usual illustration, I love it):
Tags:beetle, bugs, fairies, fairy, fantasy, jewelry, mermaid, pendnat, soldered, turtle
Posted in Collage Jewelry | 2 Comments »
Tuesday, May 26th, 2009
I found a really neat black and white illustration of a frog in a vintage children’s book and thought he’d make a great friend for one of my fairies:) I made a copy of him and colored him with colored pencils and then added a sweet fairy holding a rhinestone wand hopping a ride on his back. I also added a mushroom, frogs and mushrooms just go together, right? 🙂 They are sitting on a hill of polka dotted paper and the background is vintage book paper that’s been white washed. I hung it on a cute metal hanger and added the word “Dream”.
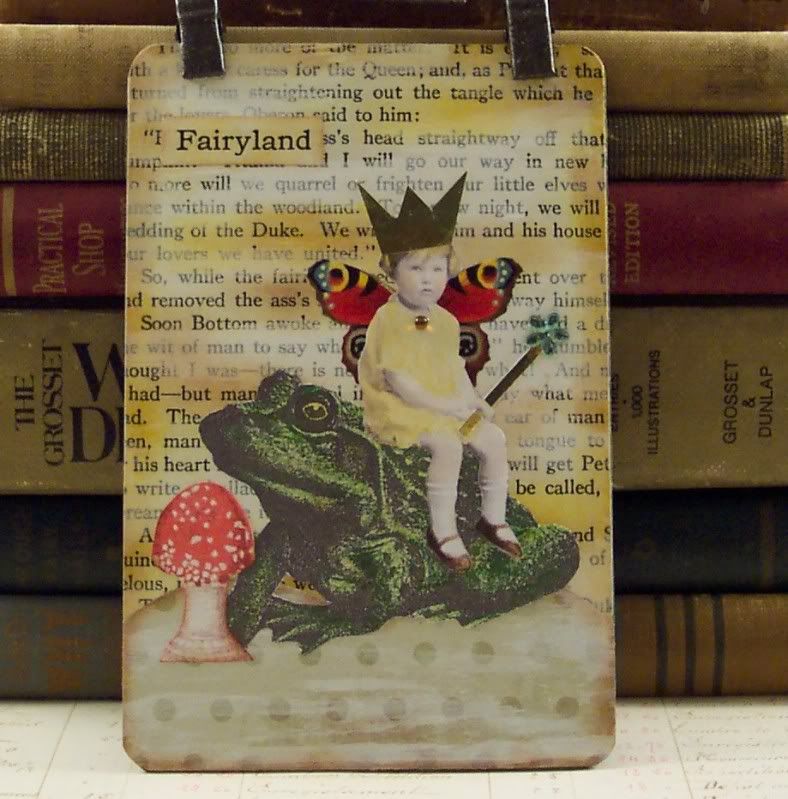
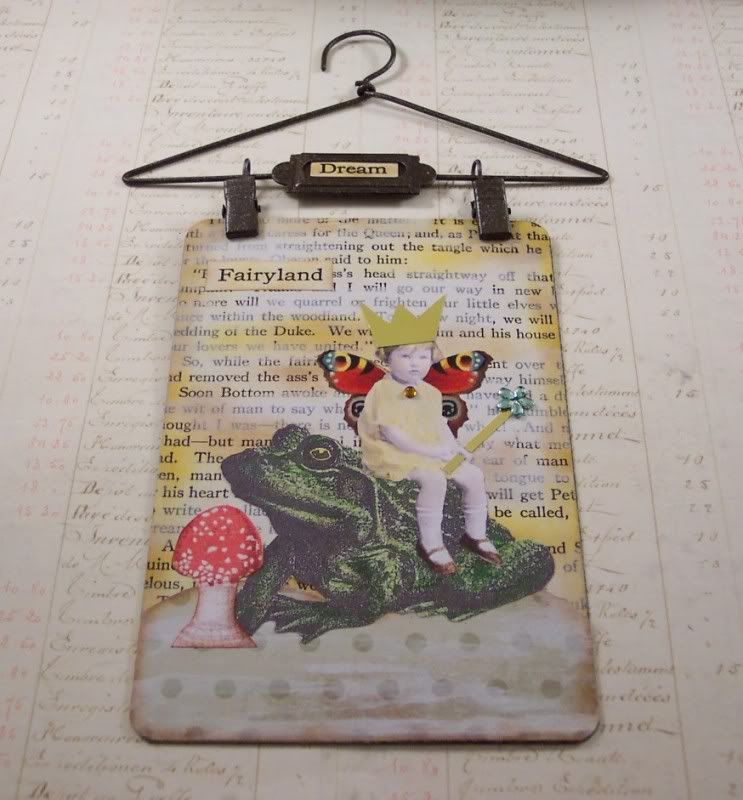
Tags:collage, dream, fairies, fairy, fairyland, frog, hanging, mushroom
Posted in Hanging Collage | No Comments »
Friday, May 22nd, 2009
Just a quick post to share a sweet little Art Card. It’s a fairy holding out her pretty dress to show it off, she’s got big yellow wings and a bow on her head with a rhinestone. I added a stamped plaque with the word Dream. It’s on green cardstock and paper torn from a vintage French text book.
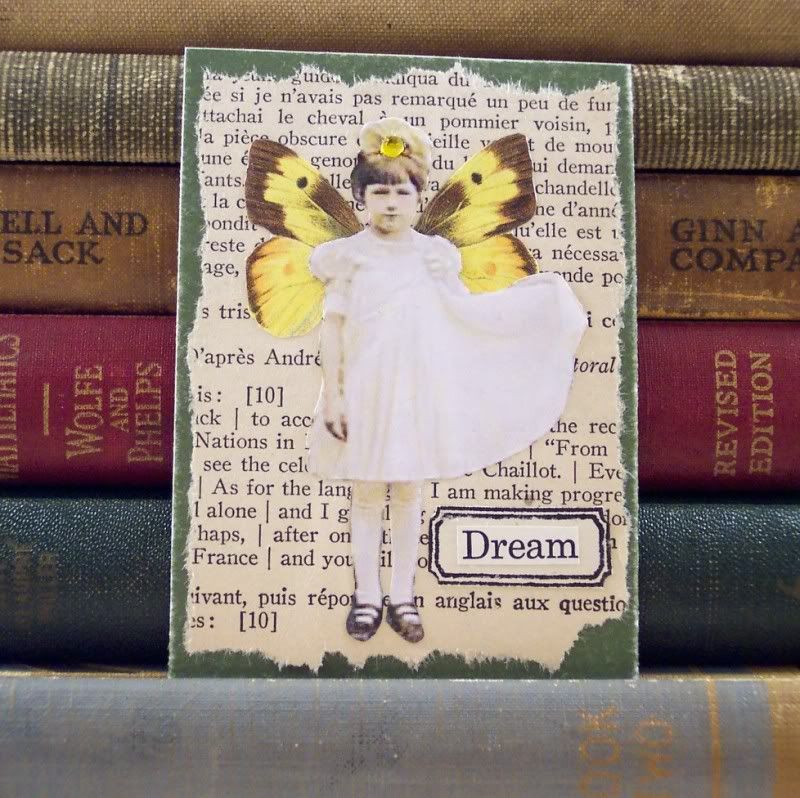
Tags:ACEO, art card, artist trading card, fairy, green, yellow
Posted in ATC | No Comments »
Thursday, May 14th, 2009
Sorry it’s been so long since my last post, my husband was on vacation so I decided to take a little break from creating and recharge a bit:)
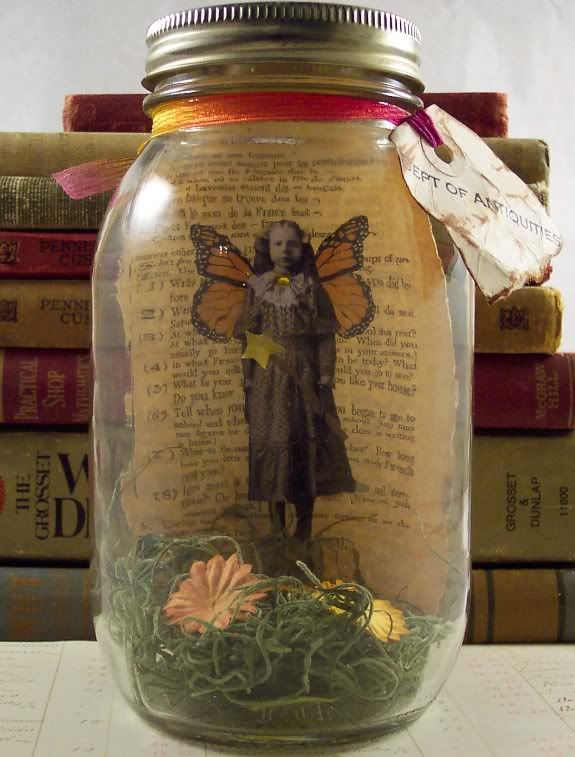
Here’s a couple of fun altered collages pieces of fairies caught inside glass jars. I made the collage of the a fairy on a vintage book page and inserted it into a canning jar (the kind with no writing imprinted on them) and tucked some fake grass and paper flowers inside the bottom of the jar. I then aged a tag and stamped some neat sentiments on them, one says “Evidence” the other says “Dept of Antiquities” and tied them around the jars with cool ribbons. The lid of the jar was too shiny and new looking for me so I used a sponge and added some black permanent ink to age them up a bit.
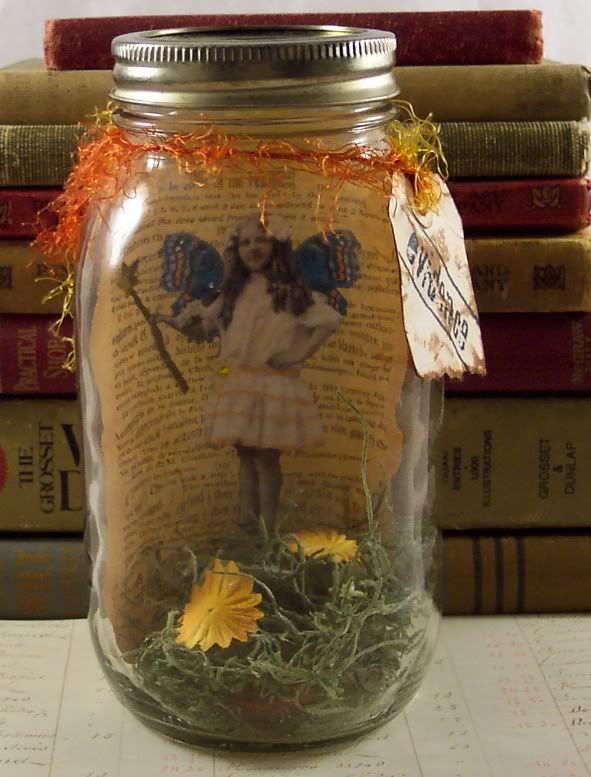
Tags:altered, captured, caught, collage, fairies, fairy, jar
Posted in 3D and Assemblage, Misc. Collage | 3 Comments »
Friday, April 24th, 2009
I’ve been trying to participate lately in more “challenges”, it’s where a website or group picks a theme, idea or product and everyone makes something based around it and then shares their art. It’s so much fun to see all the different ideas others come up with all based around the same theme.
My “Artchix” yahoo group has a current challenge called “Go Fly a Kite” and my Melange team from Etsy has a challenge called “Ticket” and an idea came to me to combine the two and so I made this ATC called “Flight Ticket”.
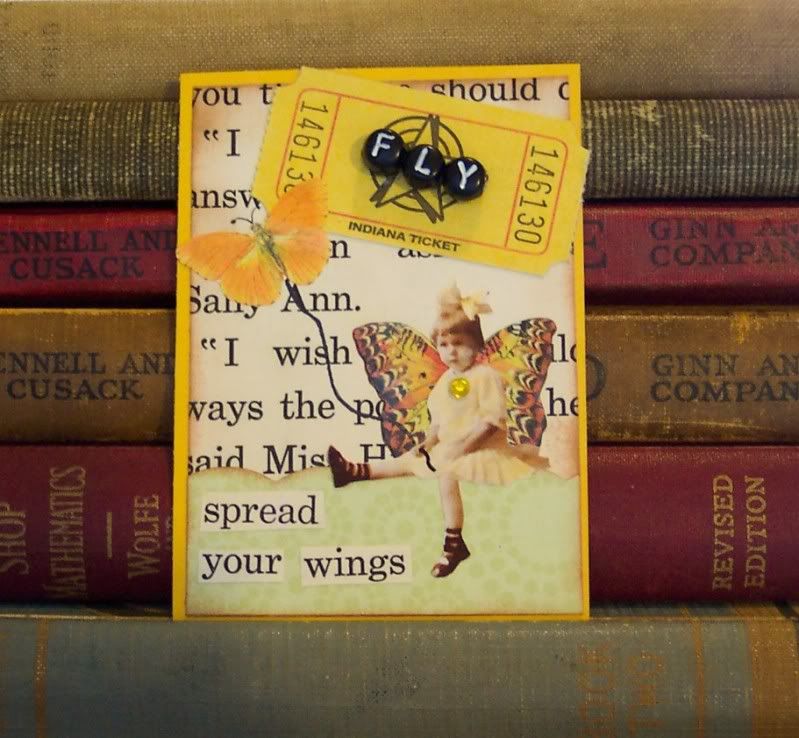
Please visit the Melange team website and click on the “Mix it up with Melange” post comments section to find links to other participants art work: http://melangeonetsy.blogspot.com/ each Wednesday a new challenge will be posted.
You might also want to consider joining the Artchix yahoo group: http://groups.yahoo.com/group/artchixstudio/
Tags:ACEO, art card, ATC, butterfly, challenge, fairy, fly, kite, ticket
Posted in Announcements and Acknowledgments, ATC | 6 Comments »
Thursday, April 16th, 2009
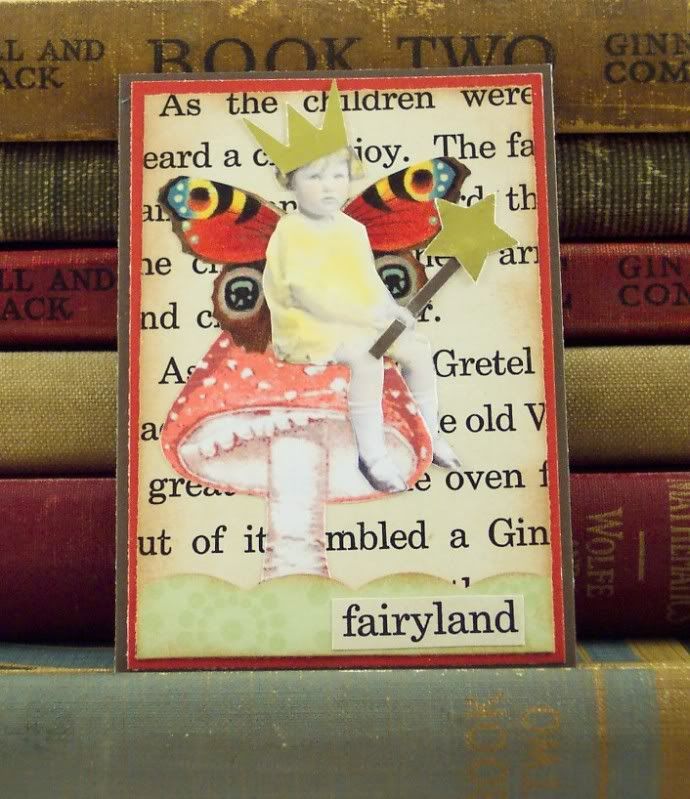
Here’s a cute little art card I made last week. It’s a sweet little fairy sitting on a mushroom wearing a paper crown I cut from gold metallic paper and holding a fairy wand with gold star punched from the same paper. I added a scalloped green paper hill and the words “fairyland” cut from a vintage children’s book. It’s layered on vintage book paper and cardstocks. Since the image of the girl was black and white I added some color to her with chalks.
Here’s some info on chalks. Chalks give you a soft pastel look (they are also called artist pastels) and they work nicely with vintage images, it looks alot like the tinting they did on their photos back then. I use q-tips to apply chalks, it gives you alot of control and it’s easy to color into small areas. Chalks can be blended and colors mixed but it’s usually very subtle. Also with the correct eraser chalks can usually be removed from most surfaces in case of mistakes, so that’s a big plus for them. I like chalks that come in little square “cakes” but “stick” chalks work pretty much the same way. Sometimes you might feel the need to “set” your chalks, a clear spray will work nicely, don’t use a sealant that needs to be brushed on, it will usually smear the chalk. Another fun thing to do with chalks is use a clear blender pen or colorless marker with them, simply rub the tip of the marker over the surface of your chalk and then color with it, it gives a much more vibrant tone to the chalk color and it’s easier to shade. Just rub the tip of the marker on a paper towel until it runs clear to clean it. Test your paper first though as these types of markers can sometimes leave an oily film behind.
Colored pencils can be used to color your vintage images too, they will give you a darker look and more shading but can sometimes look heavy handed on vintage images.
Tags:art card, ATC, atrist trading card, chalks, fairies, fairy, fairyland, mushroom
Posted in ATC | No Comments »
Thursday, April 9th, 2009
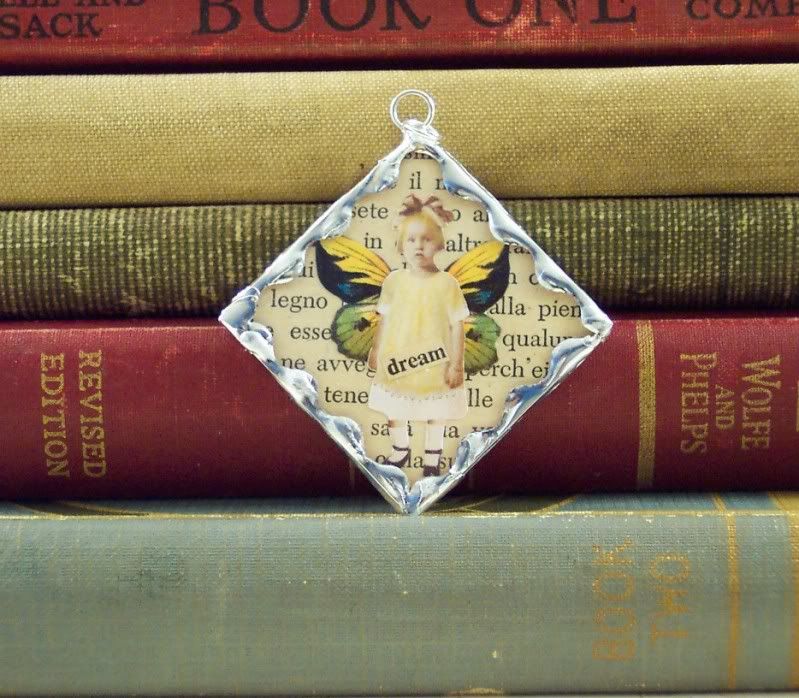
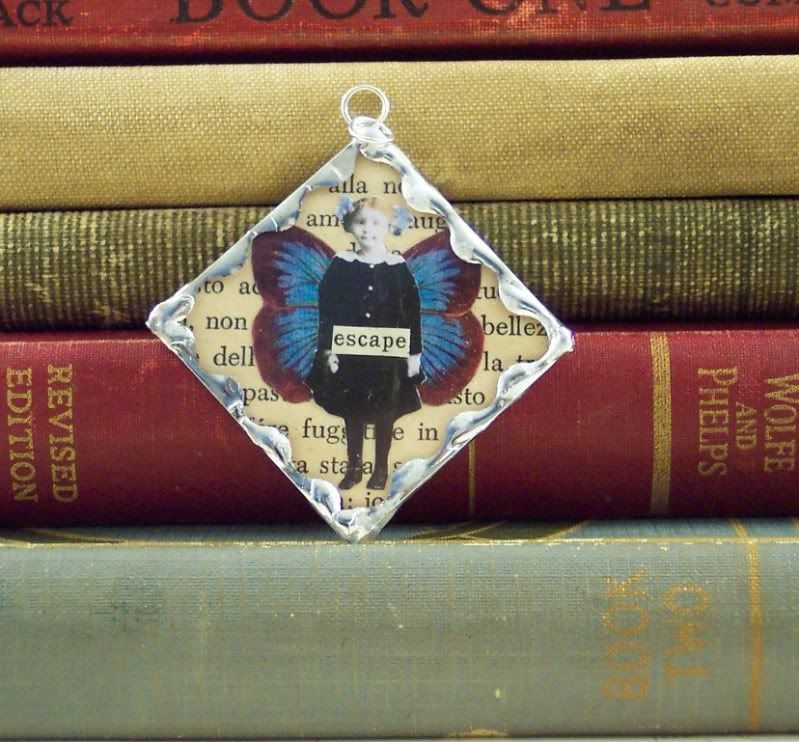
I’ve started turning some of my square pendants on their corners to make them look more diamond shape and give them a bit more interest. Here’s a couple of fairy pendants done like this:
and a also a new bird pendant too, not on it’s corner:
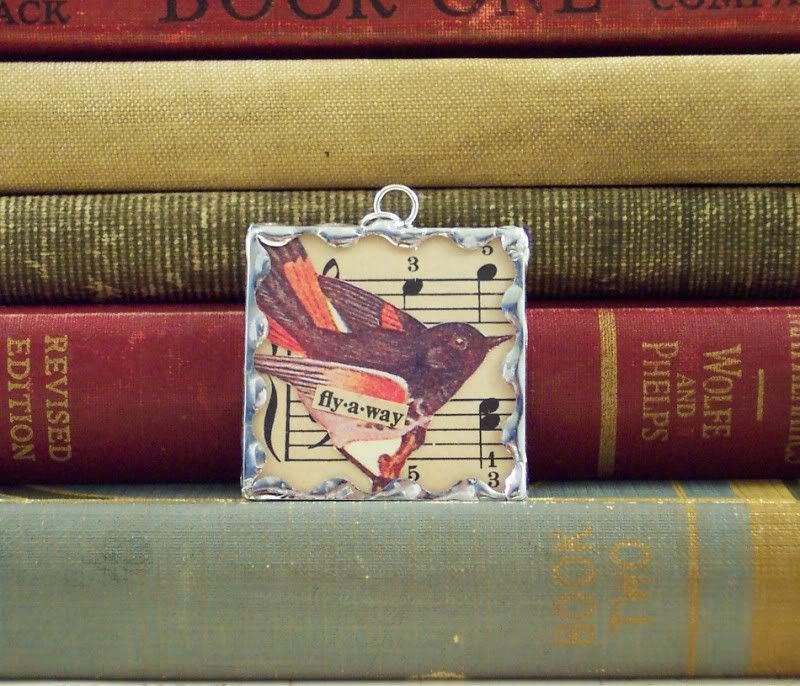
all three pendants have vintage paper backgrounds and words cut from a vintage dictionary.
They are all currently for sale in my Etsy Shop:
http://www.PisforPaper.etsy.com
Tags:bird, dream, escape, fairies, fairy, fly, jewelry, pendant, soldered
Posted in Collage Jewelry | No Comments »
Monday, April 6th, 2009
I caught another fairy:) I took a vintage image of a little girl holding a basket of flowers, colored her and added a rhinestone to her dress and gave her some yellow and green wings. I placed her inside a wooden box I painted green and then crackled with white crackle paint. ( Tim Holtz’ Picket Fence white), I think the white makes it look very shabby chic:) I also added some fake grass at her feet, an aged tag, vintage looking key and a piece of vintage wooden yard stick.
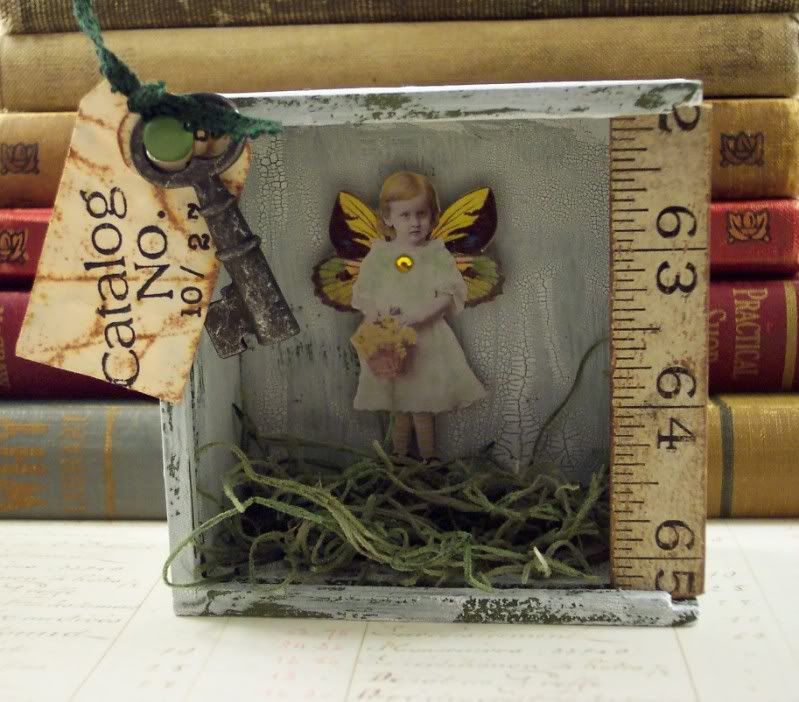
close up of fairy:
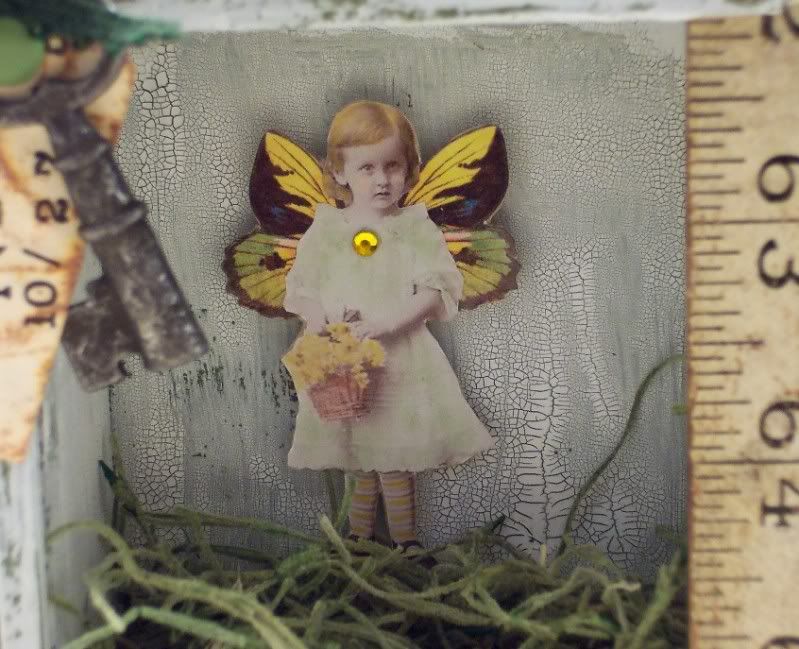
side view to show the crackle:
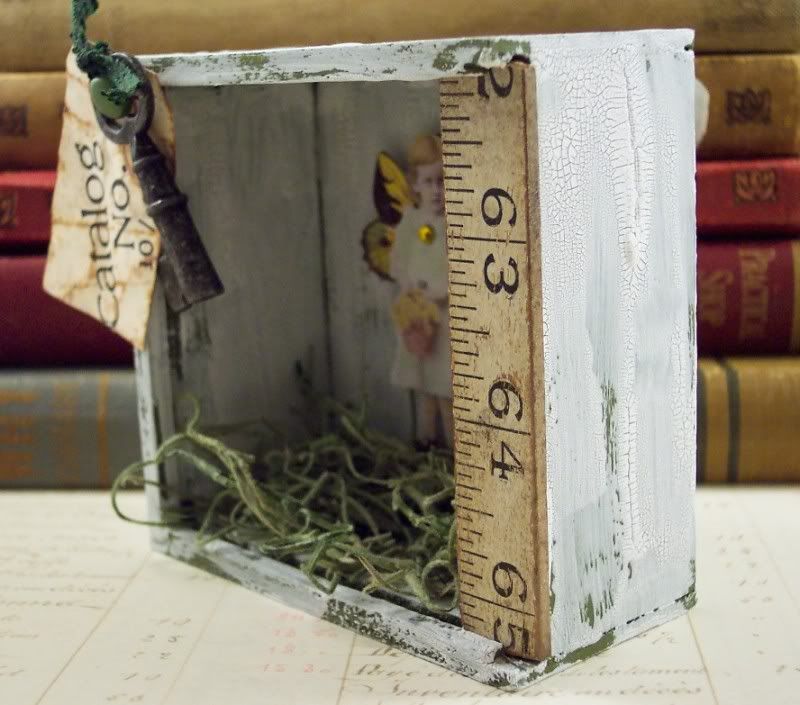
Tags:box, cottage look, crackled, fairy, painted, shabby chic, shrine, specimen, tim holtz, wooden
Posted in 3D and Assemblage, Altered Boxes | 2 Comments »
Friday, March 27th, 2009
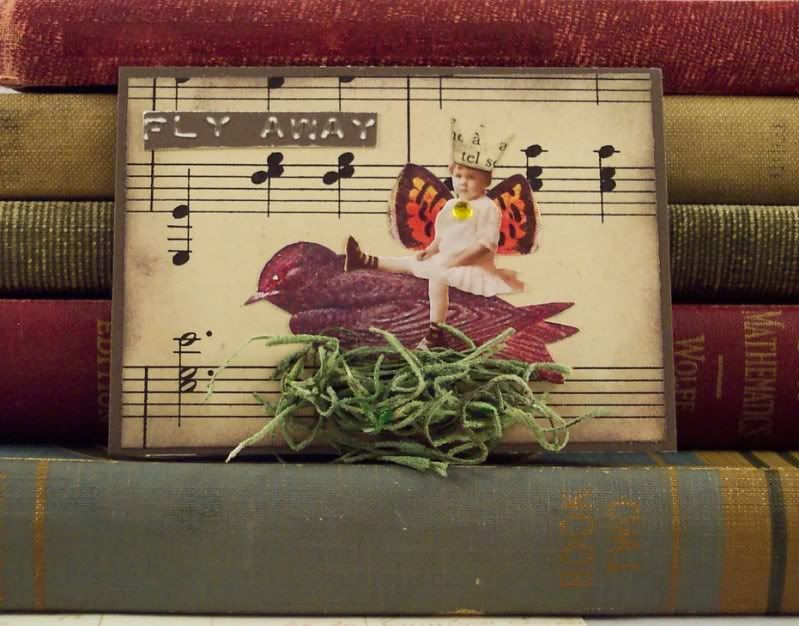
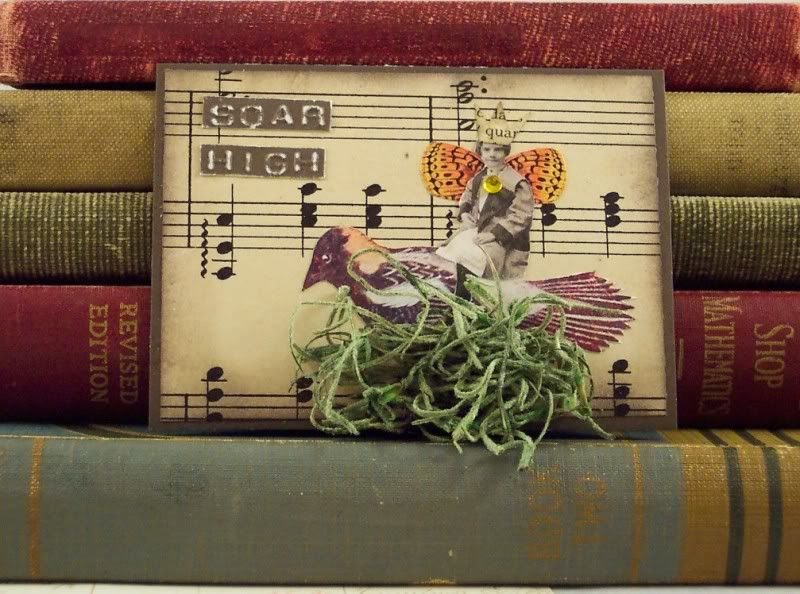
I’m totally obsessed with bird images lately and of course I’m always going to try to work a fairy in somewhere 🙂 so I decided to put the two together in my latest set of ATC’s. The base is dark brown cardstock and vintage music sheet and I added a vintage image of a bird with a little fairy princess wearing a crown sitting on the birds back. I wanted the bird sitting on a nest but couldn’t find a good image of a bird nest and don’t have a stamp the right size but I did have some fake grass so I took a small amount and squished it into a sort of nest shaped, I think it really added alot of dimension and realism to the cards. I also wanted some text so I took very thin strips of white core cardstock and ran them through my label maker and then sanded the letters so they’d show up better.
“Fly Away”
“Take Flight”

“Soar High”
Tags:ACEO, artist trading card, ATC, bird, fairies, fairy, flight, fly, music sheet, nest
Posted in ATC | 4 Comments »
