Archive for the ‘Misc. Collage’ Category

Halloween Tussy Mussy Project

Thursday, October 1st, 2009

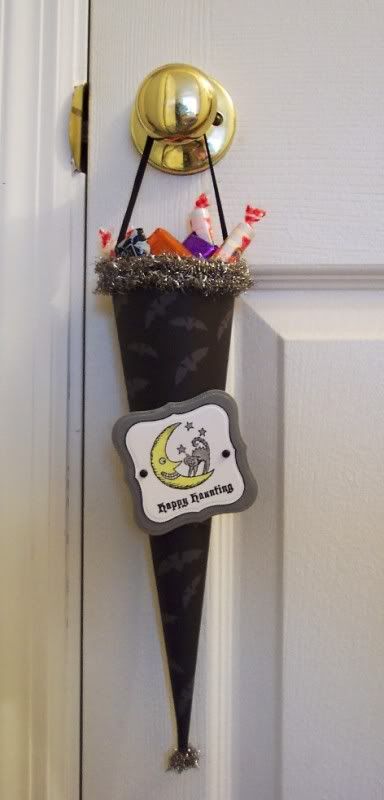
I thought it would be fun to share the instructions for a project I just finished. It’s a paper Tussy Mussy for Halloween. Tussy Mussy’s are a Victorian era hanging cone usually for flowers but this one holds candy.

Photobucket

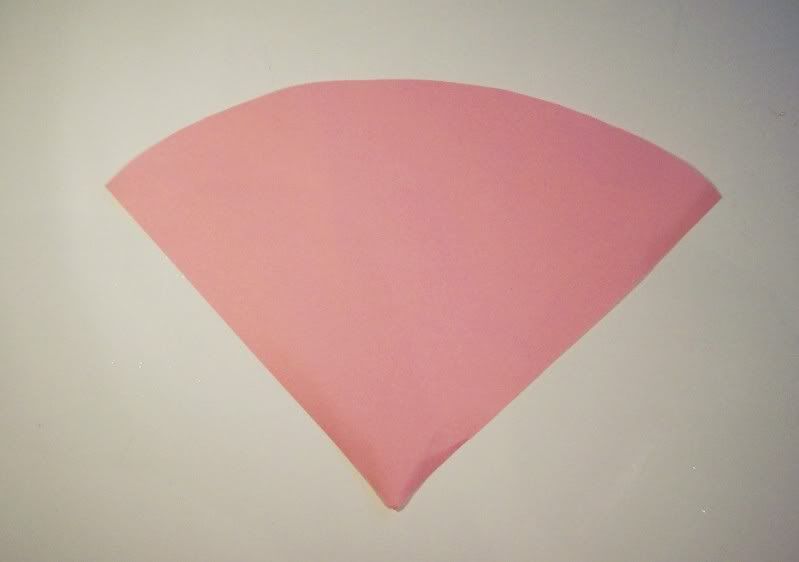
Start with a 12×12 piece of pattern paper or cardstock, mine has bats on it, flip it to the back side and turn it so one corner faces towards you and with a pencil draw a half circle from the left corner to the right corner then cut along your lines. Here’s a picture of what it should look like.

Photobucket

Next apply adhesive down one long side of the back of the cut paper and roll the other side toward the adhesive forming a cone shape.

Next apply adhesive around the top outside opening of the cone and wrap tinsel garland around, I wrapped twice.

Cut a small piece of the tinsel garland and roll it into a ball, adhere it to the bottom of the cone with a strong adhesive.

Next attach a 7″ long piece of ribbon inside the top of the cone, use a strong adhesive or brads to attach it.

Next add a stamped decoration or tag to the front, I used my Cuttlebug and Spellbinders Tag#1 to die cut and emboss a grey tag and a smaller white tag. I stamped a cute Moon and Kitty stamp on the white tag and colored it with glitter gel pens and edged it with a black marker, then layered it onto the grey tag and colored around the edges of the grey tag with a glitter pen too. I also added brads to the tag for some embellishment and then attached it to the cone with foam dots.

Photobucket

Fill with candy and hang it on someone specials door!

If you make one too please send me a link!

Spellbook

Friday, September 4th, 2009

I had a cute little paper mache book ornament that I’d been hanging on to, not sure what to do with it and I finally got the idea to make it into a spellbook for Halloween. I painted the entire book grey and then added crackle paint to the outside, and adhered silver tinsels around the sides. On the front I added an image of a little girl and put a purple witches hat eyelet on her head, I put a purple rhinestone in the hole of the eyelet to cover it up:) I stamped a few skulls on the front with Staz-on ink and added pink and purple rhinestones to their eyes. On the side I added a vintage looking stamped label and wrote “Spellbook”. I thought inside the little witch could be hiding a secret and so I filled a tiny glass bottle with beads and glitter and added some fibers to the top and a tiny label that says “poison” *insert evil witchy laugh* 😉 I think it turned out cute!

Photobucket

Photobucket

Photobucket

I Just Keep Catching Those Fairies

Thursday, May 14th, 2009

Sorry it’s been so long since my last post, my husband was on vacation so I decided to take a little break from creating and recharge a bit:)

Here’s a couple of fun altered collages pieces of fairies caught inside glass jars. I made the collage of the a fairy on a vintage book page and inserted it into a canning jar (the kind with no writing imprinted on them) and tucked some fake grass and paper flowers inside the bottom of the jar. I then aged a tag and stamped some neat sentiments on them, one says “Evidence” the other says “Dept of Antiquities” and tied them around the jars with cool ribbons. The lid of the jar was too shiny and new looking for me so I used a sponge and added some black permanent ink to age them up a bit.

Photobucket

Photobucket

A Little Something Different

Thursday, April 23rd, 2009

I wanted to make something a little different than what I normally make with my soldering and decided to make a wall hanging, it was inspired by a piece from Sally Jean who is an amazing collage and soldering artist. I took 3 glass panels, each 3″ x 1″ and cut backgrounds for them from vintage French book paper and added the words “Home” “Tweet” and “Home” to each, on the last one I also added a cute little bird nest with blue eggs. I soldered each panel with scalloped edge solder and soldered jump rings to each then attached the panels together with more jump rings, hung a chain from the top and a tiny silver bird charm from the bottom. I’m thrilled with how it came out! 🙂

Photobucket

Photobucket

back:
Photobucket

Nesting

Tuesday, March 17th, 2009

Happy St. Patrick’s Day everyone! We always celebrate in my family because we’ve got a lot of Irish ancestors and it’s also my brother’s birthday. When we were little we always left a piece of cake out for the leprechauns 🙂

Sadly I don’t have anything green to share but instead it’s blue. It’s a bird shrine box. I took a small wooden box with a hinged and latched lid that also has a wire screen in the front and painted it blue then used Tim Holtz’ crackle paint and distress inks to age the box. I added a tiny tag to the front door with the word “fly” cut from a vintage book. Inside I made a tiny collage from an image of a blue jay on some vintage music paper and over the door added the words “three blue eggs” also from a vintage book. My favorite part is the tiny wire nest I made and glued inside. I took a very long piece of thin blue wire and ran three blue speckled beads onto the middle and just started wrapping the wire around and around and then pushing it down around the sides of the beads to form a nest shape. It’s the first one I’ve made and I think I’ll probably be going to get lots of wire to make more:) Then finally I glued three vintage game piece to the bottom for feet.

Photobucket

Photobucket

Photobucket

It’s Good to be Queen

Friday, March 13th, 2009

Here’s a pretty little collage I made this week. I got some really neat pewter crown charms and added one to an image of a sweet girl along with the word “queen”. I mounted her on paper from a vintage Italian book and black and brown cardstock. I aged a very cool metal embossed frame I had with some brown ink and mounted it all on a piece of chipboard for some stability and added a metal hanger to the back. I think it’s got a simple but very elegant look to it.

Photobucket

Photobucket

Happy Happy New Year

Wednesday, December 31st, 2008

I want to wish everyone a very Happy New Year!

Here’s a cute paper banner that I made using cardstock and an old book pages. Each pendant is zig-zag stitched around on my sewing machine and has scallops cut into the cardstock and I added a large rhinestone to each pendant too. I stamped the letters in different bright inks and used different colors of organdy ribbon to tie them all together.

Photobucket

close up:
Photobucket

it’s currently for sale at my new Lollishops shop:

http://www.Lollishops.com/PisforPaper

Pop a Top

Friday, November 21st, 2008

I had some unused bottle caps in my drawers of “stuff” and thought I’d make some magnets with them. I used a circle punch and punched out some circles from old french book pages and also some faces of some cute vintage little girls, I inked the edges and collaged them together, adding some different words cute from books to describe each one. I filled them with dimensional liquid and while it was still wet added some regular glitter and some clear glass glitter to add some sparkle. I then attached magnets on the back.

Photobucket

To Dye For!

Tuesday, August 19th, 2008

Did you ever have something that just wasn’t quite right for your project? Well, consider aging, dye, distressing, etc. Sometimes it can make something look perfect for your project. I wanted to show you how to tea dye some lace. For my large mannequin I wanted some lace trim and found the right style and size but it was white and I needed something more aged looking so I decided to dye it using tea. It’s really easy and works with lace, ribbons, fabric and even paper!

I started out by putting hot water from the tap into a plastic container and putting in a large tea bag and letting it seep for about five minutes

Photobucket

Then I dunked in the lace, pushing it down into the water with a plastic spoon, making sure it was totally submerged

Photobucket

I let it sit in the water for about 30 minutes (let it sit longer or add more tea for a darker look). Then I removed it and placed it on a stack of paper towels between an old towel

Photobucket

Then I pressed out as much of the the water as I could

Photobucket

Then I hung it over a hanger to dry (which didn’t take long) and it came out looking nice and old:)

Photobucket

Give it try sometime and let me know how it works. You’ll get different result depending on what you are dying, so you might want to try a scrap first before you ruin 6 yards of expensive ribbon:)

Beeswax Collages

Thursday, May 29th, 2008

A while ago I took some wonderful classes with collage artist Mary Jo McGraw. I’ve not taken many classes, I’m pretty much self taught but I learned alot from her and had a great time “playing” with other artists. Take a class sometime, even if you’ve been doing your art for a long time, you can always learn something new and get inspired by other people and their work, you’ll be glad you did.

One of the class I took with her was working with beeswax, we took copies of photos, pages from old magazine, etc and dipped them in beeswax. And adhered them to cardstock and added stamping and other embellishments like mica and buttons.

Here are some of the pieces that I made:

Geisha:
Photobucket

Vincent Price (I love him:)) I re-melted the wax with a heat gun and pushed buttons and mica flakes into the hot wax to adhere them:
Photobucket

Victorian Woman, the buttons were dipped into alcohol inks before being added to hot wax:
Photobucket

Victorian Girl:
Photobucket

And another Geisha, I poured wax onto the piece and then stamped into it with a rubber stamp , after it cooled I rubbed pearl ex onto the wax:
Photobucket

So, you may be asking how is the heck do you do this?:) This is the easiest way I’ve found to use beeswax. I bought a small inexpensive mini crockpot just for my beeswax (once you use it for wax you can NOT cook food in it, so keep this in mind). I bought the small beeswax pellets at Michael’s craft store, they are in the candle making section. You can use the large chunks of wax too put the pellets melt faster and are easier to work with. So just turn on the crock pot, pour in some pellets, filing it up about half way and let them melt, this can take quite a long time, be patient:) When everything is melted you can then dip your items into the wax, be sure to use tweezers or small tongs as the wax is VERY hot. Be sure to dip quickly and pull your item out fast, if it sits in the wax too long it will not be very clear and you might not be able to see your image underneath. The wax dries very quickly so you can lay your piece down almost immediately after dipping. When you are done turn off the pot and let the wax cool inside and harden, when you are ready to use it again just turn on the pot and let the wax remelt.